Monday, June 29, 2009

Fiddlehead Beach Party Top

I made this little summer top for Marie last week...couldn't seem to get good pictures, she'd just woken up from a nap and had gotten it all wrinkly, but here you have it.

Fabric is from a vintage sheet I bought at the Salvation Army. I'm on a vintage sheet kick right now. I can never resist roses anyway.

I love, love, love this free pattern found HERE at fiddlehead.blogspot.com Thank you so much for designing and sharing this, Kristin!

The pattern is only sized for 24 months right now, but it was easy to make a bit smaller for my 8 month old (who wears 9-12 month clothes). I took 5/8 inch seams instead of the recommended 3/8 inches, shortened the straps, and overlapped the front bodice pieces a bit more. The back has elastic in it, so the fit is adjustable. Super easy to sew together! I'd probably make more!

Love,
Jessica

Friday, June 26, 2009

Quick Tip: Getting Even Gathers

Ever have problems with the gathers on the front of a dress or on the top of a sleeve being bunched up all unevenly?

Mom taught me this little trick years ago, and it really helps. First sew your basting lines as the pattern directs and then gently tug your bobbin threads to pull up your gathers. Pull up the gathers till your piece is about the length it needs to be. Match up and pin the ends, the center, and any notches your pattern has.

Next, take a spare pin and use it like a guitar pick, running the end over the gathers between each pinned section. This will even up your gathers just like that!

Add more pins to keep the gathers in place and take it to your sewing machine. Sew as directed by your pattern. I keep a spare pin in hand and continue to run it over my gathers from pin to pin to as I sew.

Finished! Nice even gathers. Now go try it on your next project!

Blessings,
Jessica

Wednesday, June 24, 2009

Promised Pictures


More pictures on Flickr.
Complete review at Pattern Review.

Thank you for all the sweet, encouraging comments you've left as I've documented my progress on this dress. I feel so blessed!
Ruth

Fun Vintage Pattern and Fabric Giveaway!

The Whipstitch blog is hosting a great vintage pattern giveaway and fabric to make your choice of whichever pattern you pick!

Go HERE to enter. This is one of the patterns I loved... View 2, in the blue would be so cute on me, don't you think?

Hurry, giveaway ends tomorrow at 10pm

Blessings,
Jessica

Tuesday, June 23, 2009

The dress is complete!

The Summer Sundress is finished! I'll show a few details here, and tomorrow or the next day I will post pictures of Emily wearing the dress.

The placket turned out fine, thanks to Summerset's tutorial and Goosegirl's suggestion to cut the placket on the bias and use Fraycheck at the point.


~the placket from the inside~


Well, I just could not decide whether to add a green band to the bottom of the dress or not. I liked it both ways. So instead, I added a 1" band of green, inserted 2 inches up from the hem. I love the way this turned out.

~green band inserted into the skirt~


The dress is fully lined with white batiste. The dotted Swiss fashion fabric is somewhat sheer, and with the lining there will be no need for Emily to wear a slip. The dress has its own built-in (rather, sewn-in) petticoat.

~the inside of the dress~


This dress is quite full---just think of the twirling that Emily will be able to do in this dress! I didn't use the skirt pattern piece since it is just a rectangle. Instead I just cut a rectangle using the full width of the fabric, assuming it was 45" wide. I was wrong--the fabric was approx. 58-60" wide because the skirt measures at a whopping 114" wide! A lot of twirling potential!


~full skirt~


The dress looks lovely on Emily, and I can't wait to take pictures tomorrow.

Okay, I'm off to practice my oboe---band concert on Thursday in Edmond. If you're in the area, it's going to be a fun concert of patriotic music and free watermelon and icecream afterwards.

Ruth


Sunday, June 21, 2009

Progress--Slow but Steady

In the 30 minutes I had for sewing today, I put the bodice together--complete except for buttonholes and buttons. I couldn't wait to try it on Emily, and I'm happy to report that the fit will be perfect!


The instructions called for sewing the sash ties directly on top of the side seams after the dress is completely finished. Instead, I chose to sew the sash ends into the side seam allowance. This gives a smoother look and avoids turning the raw edges under and topstitching the ties down. Also, instead of gathering, I made a little pleat in each tie before sewing it into the seam allowance.


After sewing the lining together with the fashion fabric and turning it right sides out, I pressed the seam allowance with the fashion fabric slightly rolled to the inside. I also edge stitched the lining to the seam allowance to ensure that the lining will not peek out on the right side.


I love the back of the dress, especially the big bow. Now I need to decide on buttons, 3 down the back and 2 for the straps.


This week I hope to finish the dress. The skirt should go together quickly once I get past the placket. From past experience, my plackets don't come out that great. Any suggestions for a good placket method? I'm open to any tips you can give me!

Ruth

Saturday, June 20, 2009

Ready to Assemble the Bodice

The bodice is ready to assemble, but not today---too many other things I need to do first: eat lunch, give Em a bath, practice my oboe, and attend a wedding. :)

In the short time I had for sewing today, I managed to get the bodice parts of the Vintage Sundress prepped and ready to assemble. This included sewing 8 darts, sewing and turning 2 straps, and sewing and turning 2 sash ties.


My favorite tool for turning tubes, both wide or narrow, is the Fasturn. The Fasturn works great for those teeny tiny spaghetti straps as well as for wide tubes.


The following pictures show how I usually sew darts. I'm not expert by any means, but this method works for me.

First of all, I mark my darts by clipping the dart "legs" and marking the top of the dart with a pin. I think you can see the leg clips in the picture. I drew lines to show where I will be stitching---hopefully my sewing is straighter than the drawn lines.


I then fold the fabric in half along the dart, matching the dart legs together. Using a sticky note, index card, or piece of paper (whatever I find handy on my sewing table), I place it along the stitching line and use it as a straight edge guideline as I sew. The trick is to sew along the straight edge, not through it. As I approach the top of the point, marked by the pin, I shorten my stitch length to next-to-nothing--1.0 or 1.5 on my machine-- and I sew off the fabric for a few stitches. This "knots" the thread, eliminating the need to back-stitch at the dart point, and thus eliminating unnecessary bulk. I've never had a dart come undone doing it this way.


The sewn dart on the inside:


The sewn dart from the outside, after pressing. No pucker!


This dress has a total of 8 darts: 4 on the outside and 4 on the lining. I am using batiste for the lining of the dress.


My excitement about finishing this dress is growing. I love to sew for long periods of time, and this sewing in short periods of time is about doing me in. I can't wait to put this bodice together--sigh--I really need to get going with the other things that must be done first.

Ruth : )

Fabric Stack


A new project has been calling my name, and don't you just love the fabrics I'm working with?!!

I've not worked on the Vintage Sundress at all this past week. Hopefully today....

Ruth

Monday, June 15, 2009

More Fun with the Babies...

We've been taking advantage of the nice weather lately...today a friend and I took our kids to the park for lunch and then hit the local splash pad. It was a great way to chill off and enjoy some water. Elliot had BLAST! He wouldn't stop long enough for me to get a good picture.

Marie had fun sitting next to my friend's little girl. Got to love those the girly girls!

Last night we took our annual duck pond picnic as a family. Sad that we've only done it once a year...perhaps we can get out there more this summer. Mom, Marie wore the little purple outfit from you. It fits perfectly and looks so cute!

Ok, here's a picture of the refashioned skirt I mentioned yesterday. Basically I just cut off the bottom couple ruffles to make it just below knee length. I folded down the top to create a casing and put in elastic to make it fit.
I also got a picture of the pattern I used for Marie's dress. I made view c, but I'd really like to make the pinafore and pants this summer too. I love the little pleats on the front of the pinafore.

That's all for now!
Jessica

Saturday, June 13, 2009

Photo Update from Jessica

Well, I have been sewing bits and pieces here and there. I made 3 pairs of pj pants a couple weeks ago but don't have any pics to share with you. I uploaded a new baby quilt in my shop tonight and am working on finishing this one too...I just have to sew the binding on it.

Tonight I refashioned a garage sale skirt for myself. It was one of those gathered peasant style skirts with multiple layers, and it was too long and too big, so I cut off the zipper and put elastic in the waist, and then I cut off one of the bottom layers to make it shorter. Really easy and now I have a new skirt that only cost $1.00!

This last week I made Marie a sweet baby girl dress. I used a vintage Mccalls pattern, lace from my stash (no idea where it came from!) and a Lecien print that I'd ordered in March. It actually came out huge (just really, really fat), and I didn't realize it till it was completely done. So I had to cut it apart and cut some off the sides. So frustrating. I don't know why I didn't try it on before I put the sleeves in.

Marie didn't want cooperate for the photo shoot. She wouldn't look at us or smile and ended up in tears before we were done. Even Aunt Katie couldn't console her. Poor baby, it was really hot and humid and we were making her sit on the *grass*.

I need to take some pictures of my garden. Yes, I have a real garden this year! My tomato plants have lots of little green tomatoes and I'm hoping to get carrots, cucumbers, squash, bell peppers, and okra. I already got some lettuce and bunches of sweet snow peas.

I will share a picture of my new compost system built from seven old pallets. I'm thankful I have such a handy husband to build me things like this!

The first bin if full of mulched leaves and grass and kitchen scraps, and we are starting to add to the second one. If only excitement would make it age faster. It certainly doesn't look like real compost yet despite the fact that I check on it almost daily.

We took Elliot and Marie to the zoo last week for the first time...we saw lions, and bears, and bats (shutter). We all had so much fun!

Blessings,
Jessica

Wednesday, June 10, 2009

Little Green Jacket


I didn't think it was going to happen today, but I actually found time to sew! The little green jacket is just about finished.

My dilemma of how to finish the armhole edges has been resolved. I really liked Summerset's idea of binding the armhole edges, but I did not have enough green fabric for both armhole binding and the band at the bottom of the dress. (BTW, my decision of whether or not to add the green band still has not been determined). So, I searched in a few of my sewing reference books and followed the method for a lined vest as found in Connie Amaden-Crawford's book, A Guide to Fashion Sewing.

This picture shows the jacket front and lining pieces pinned together with the collar sandwiched between. The white lines show where I stitched. The corners were left unsewn until I sewed the side seams.


What complicated this procedure is that there are no true armholes in this pattern. Instead the armholes are part of the side seams. I followed the lined vest instructions as much as possible, but when it came to the armholes, I had to improvise a bit. The completed arm openings ended up nice and smooth, and I am very happy with the finishing.

Here you can see how the armhole openings are in line with the side seams.


The little green jacket looks very sweet on Emily. Now I'm looking forward to starting the matching dress as time permits.

Ruth

Monday, June 08, 2009

Vintage Pattern -- Dress and Jacket


I'm finally getting around to using the fabric that I wrote about in a previous post. Yes, and I've decided on the pattern: Simplicity 4689. This vintage girls dress pattern is copyrighted 1954. It's been a long time--20 years, maybe--since I've sewn anything from a pattern this old, and already I can tell that I'll need to make a few changes.


Please help me decide: Should I add a band of green to the bottom of the dress? Or leave it off? I drew some sketches, but I still can't make up my mind.


Today I was hoping to sew, but my oboe was calling my name. After rehearsal at church yesterday afternoon I realized how much more I need to be practicing. So...today I practiced my oboe but didn't get any sewing done.


I did managed to get the green bolero jacket cut out and interfaced. I used interfacing from Sew Exciting (I love this stuff!), but I think I needed a lighter weight for this almost-sheer fabric. I can see the interfacing showing through to the right side of the fabric. At this point there's not much I can do to change anything; I don't have enough fabric to re-cut the jacket, and I'm hesitant to try peeling off the interfacing and replacing it with something else. So it will remain as it. Somebody reassure me that it'll be okay.

I made a mistake with the interfacing on the jacket front---
I fused the interfacing to the side seams instead of the front. Oops!


In the picture below, the fabric on the left is interfaced, and the fabric on the right is not. You can see the web of the interfacing on the left-hand fabric showing through.


One change that I've not yet thought my way through is how to eliminate the handsewing on the jacket. You see, the instructions say to turn the lined jacket through the armholes and then sew the armhole openings closed by hand. Ick. My slipstitching isn't the best and I'd like to avoid it. I'm going to look at a few of my reference books and find another way to do this...perhaps "bagging" the jacket or something else. Any ideas? What complicates this is that the armholes are not true armholes but just the top part of the side seam left open. If you understand what I'm saying, and you know of a good method for this, please let me know. :)


Okay, I'll be posting as I progress along on this dress.
Thanks for reading.

Ruth


Questions and Answers

Thank you for all the wonderful, encouraging comments that were written on the previous post about the shorts and shirt I made for my son. Comments are fun to read---thank you, thank you, thank you. I love comments. : ) Among the comments were a few questions that I'll answer here:

MaryPat R said..."Is there a zip in that fly or is it just for show?"


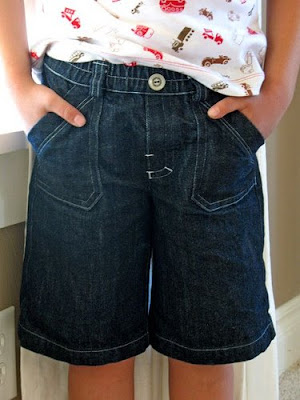
The shorts have a mock fly front--no zipper. The button is also just for show, although it never shows because Jacob does not tuck his shirts in. :)

Jessica said..."can you explain sometime how to do this waistband treatment?"

Jeannine said..."I too would like to know how you did the waistband."

Jessica and Jeannine, I intended to write a post with a pictures of how I did the waistband, but honestly and truly, I have not sewn a single stitch since I finished the shorts and shirt. Soon, I hope to make more shorts, and I'll be sure to take lots of pictures. Until then, here is a very brief explanation of what I did: Fold the waistband in half lengthwise and press; sew the short ends of waistband to form a circle; sew the waistband to the garment--right side of waistband to the wrong side (the inside) of the shorts; enclose circle of elastic inside the waistband; turn up the seam allowance of the unsewn long edge of waistband; topstitch the waistband to the garment (you'll be topstitching on the right side of the garment), stretching elastic as you topstitch. I also topstitched through the center of the waistband, again stretching the elastic flat as I sewed.

KarenH said..."Don't you love those surprise fabrics at WM? I'm going to be really sad when their fabric depts are gone for good."

Yes, Karen, I always check the fabric department at WM because I never know what I may find. Surprisingly, lately I've found several nice fabrics at WM--and it makes me happy. I hope that my local WM will keep their fabric dept. for a good long time!

Tammy said..."I just started my blog and don't really know what I'm doing yet. I would love some pointers from you guys! How do you get people to actually read your blog?"

Tammy, I wish I had an answer to give you about blog readership, but I really don't know why people read this blog and come back if they do. Jessica and I don't purposely set out to get readers or comments, and we don't "market" our blog. Don't get me wrong---we love having readers, and we love the comments. I'll admit that it's nice knowing that a few people read what we write. I'm sorry I don't have a better answer, but if you do a bit of google searching, you will find many articles about starting and growing a blog.

Your question has made me ponder about why I blog. Sometimes it all seems so trivial to me. Does writing on my blog really matter? Just why do I blog about my sewing? This could be a whole post in itself. But to sum it up briefly...hmm.... The reasons why I started blogging and why I continue to blog are different. Jessica and I initially started this blog in 2005 (wow! has it really been that long ago?!) because she was getting married and moving from home, and we wanted a way to share our mutual love of sewing with each other. Also, the blog was a way to document the process of sewing Jessica's wedding dress. Record keeping and documentation of sewing projects was a big motivation for me to blog. I don't keep everything I've made forever, and before blogging I wasn't good at taking pictures of my projects. Having a record has been helpful in many ways. For example, when I enter items in the county fair each fall, I come back to the blog to see what I've sewn the past year that can be entered. No way would I remember otherwise.

Reasons why I continue to blog are varied---record keeping, of course; sharing ideas, tips and techniques; perhaps helping others with what I've learned; oh, there are more reasons that I won't go into, but one last thought about why I blog is community. The sewing community is awesome. I have been encouraged, motivated, challenged, and inspired by so many wonderful people! Blogging, for me, has been fun and enjoyable. If you care to comment, I would love to know your reasons for blogging.

And because it seems I can't write a post without a picture, I'll post this one of Jacob wearing his shorts after they had been through the laundry a few times.

Ruth